Understanding 3D Scanner Accuracy, Precision, Resolution, and ISO 10360 Standards
In modern engineering, manufacturing, and industrial inspection, 3D modeling accuracy is no longer optional — it is a critical factor that directly affects product quality, functional performance, compliance, and cost efficiency. With the rapid adoption of 3D scanning technologies in reverse engineering, dimensional inspection, and digital twin creation, companies must clearly understand how accuracy and quality control are defined, measured, and validated in 3D modeling workflows.
Despite widespread use, many organizations still confuse key technical concepts such as accuracy, precision, and resolution, or underestimate the importance of international standards like ISO 10360 when selecting or validating a 3D scanner. These misunderstandings can lead to unreliable measurements, non-conforming parts, and costly rework.
This article provides a deep technical analysis of:
3D scanner accuracy and influencing factors
The role of 3D scanning in quality control
The difference between accuracy, precision, and resolution
How ISO 10360 standards define and verify metrological performance
This guide is designed for engineers, quality managers, and decision-makers seeking reliable, traceable, and industry-compliant 3D measurement solutions.

What Is Accuracy in 3D Modeling?
Accuracy in 3D modeling refers to how closely a digital 3D model represents the true geometry of the physical object being scanned. In metrology terms, it describes the deviation between measured values and reference (true) values.
In industrial applications, even small deviations can have serious consequences:
Assembly mismatches
Functional failures
Reduced fatigue life
Regulatory non-compliance
3D Scanner Accuracy Defined
3D scanner accuracy is typically expressed as:
Linear accuracy (µm or mm)
Volumetric accuracy (µm + µm/m)
Volumetric accuracy becomes especially important for large-scale components, such as aerospace structures, automotive body parts, or heavy machinery frames.
Key Factors Affecting 3D Scanner Accuracy
Accuracy in 3D scanning is influenced by a combination of hardware, software, environmental, and operational factors.
1. Scanning Technology
Different 3D scanning technologies exhibit different accuracy profiles:
Laser triangulation scanners
High accuracy for small to medium parts
Sensitive to surface reflectivity
Structured light scanners
Excellent surface detail
Accuracy depends on calibration and lighting conditions
Laser trackers & portable CMMs
High volumetric accuracy
Ideal for large components
LiDAR systems
Long-range capability
Lower resolution and accuracy compared to metrology-grade scanners
2. Calibration Quality
Calibration ensures the scanner’s internal reference system aligns with known standards. Poor calibration leads to systematic measurement errors, even if the scanner resolution appears high.
3. Environmental Conditions
Temperature fluctuations, vibrations, and ambient lighting can significantly affect scanning accuracy, especially in shop-floor environments.
4. Surface Properties
Highly reflective, transparent, or dark surfaces can cause:
Data noise
Point cloud gaps
Measurement distortion
Surface preparation (e.g., matte spray) is often necessary for high-accuracy inspections.
3D Scanning in Quality Control
Why 3D Scanning Is Transforming Quality Control
Traditional quality control methods rely on:
Contact CMM measurements
Limited sampling points
Time-consuming inspection cycles
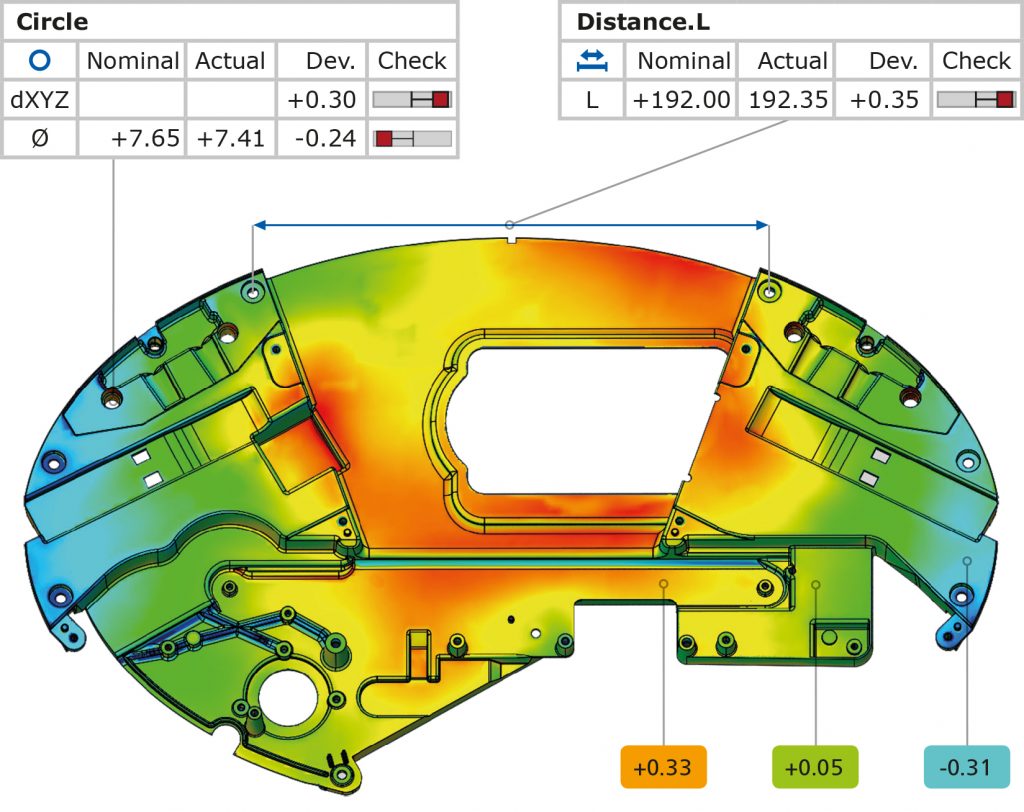
3D scanning enables full-field inspection, capturing millions of data points across the entire surface of a part.
Advantages of 3D Scanning for Quality Control
Comprehensive geometry coverage
Faster inspection cycles
Non-contact measurement
Digital traceability
Integration with CAD and PLM systems
Typical Quality Control Applications
Dimensional inspection against CAD models
First Article Inspection (FAI)
GD&T verification
Deformation and wear analysis
Statistical process control (SPC)
By comparing scanned data directly with nominal CAD geometry, engineers can detect local deviations, trends, and systematic manufacturing issues.
Accuracy vs Precision vs Resolution in 3D Scanning
One of the most common misconceptions in 3D metrology is treating accuracy, precision, and resolution as interchangeable terms. In reality, they describe very different measurement characteristics.
Accuracy
Closeness of a measurement to the true value
Indicates measurement correctness
Example:
If a true dimension is 100.000 mm and the scanner measures 100.010 mm, the accuracy error is 0.010 mm.
Precision
Repeatability of measurements under the same conditions
Indicates measurement consistency
A scanner can be highly precise (repeatable results) but inaccurate if it consistently measures the wrong value due to calibration errors.
Resolution
Smallest detectable feature or point spacing
Indicates level of detail, not correctness
High resolution does not guarantee accuracy. A scanner may capture millions of points but still produce inaccurate geometry if systematic errors exist.
Why This Distinction Matters in Quality Control
Accuracy ensures parts meet design intent
Precision ensures process stability
Resolution ensures sufficient detail for analysis
Industrial quality control requires all three, but accuracy remains the most critical parameter.
Measurement Uncertainty in 3D Modeling
No measurement system is perfect. Measurement uncertainty quantifies the range within which the true value is expected to lie.
Sources of uncertainty include:
Scanner hardware limitations
Calibration artifacts
Environmental conditions
Operator influence
Data processing algorithms
Understanding uncertainty is essential for:
Tolerance verification
Compliance reporting
Risk-based decision-making
ISO 10360 Standards Explained
What Is ISO 10360?
ISO 10360 is an international standard that defines acceptance and reverification tests for coordinate measuring systems, including:
CMMs
Optical scanners
Laser trackers
Portable measuring arms
It provides objective, traceable methods for evaluating system accuracy and performance.
Key Parts of ISO 10360 Relevant to 3D Scanning
ISO 10360-2: CMMs for size measurement
ISO 10360-7: CMMs with imaging probing systems
ISO 10360-8: CMMs with optical distance sensors
ISO 10360-10: Laser trackers
ISO 10360-13: Optical 3D coordinate measuring systems
Each part defines:
Test procedures
Acceptance criteria
Maximum permissible errors (MPE)
Why ISO 10360 Matters in Industrial Quality Control
Ensures traceable accuracy
Enables fair comparison between systems
Supports regulatory compliance
Reduces risk of measurement disputes
For companies operating in aerospace, automotive, medical, and energy sectors, ISO-compliant measurement systems are often mandatory.
Verifying 3D Scanner Accuracy According to ISO 10360
Acceptance Testing
Performed when a system is installed or purchased to confirm it meets manufacturer specifications.
Reverification Testing
Conducted periodically to ensure the scanner maintains performance over time.
Common Verification Methods
Length measurement tests
Sphere-spacing tests
Volumetric accuracy checks
Environmental compensation evaluation
These tests ensure the scanner remains suitable for critical quality control tasks.
Best Practices for High-Accuracy 3D Modeling
To achieve reliable and repeatable results, organizations should implement the following practices:
Select scanners with ISO 10360 compliance
Perform regular calibration and reverification
Control environmental conditions
Use appropriate surface preparation
Train operators in metrology principles
Validate results using reference artifacts
The Role of Engineering Consulting in 3D Quality Control
Implementing 3D scanning effectively requires more than hardware selection. Engineering consulting expertise plays a vital role in:
Measurement strategy development
Accuracy requirement definition
Tolerance analysis
Quality system integration
Risk assessment
At Avesta Consulting, advanced simulation, reverse engineering, and digital inspection workflows are designed to ensure measurement reliability, compliance, and operational efficiency across industrial projects.
Conclusion
Accuracy and quality control in 3D modeling are foundational to modern engineering and manufacturing success. Understanding 3D scanner accuracy, the role of 3D scanning in quality control, and the differences between accuracy, precision, and resolution enables organizations to make informed technical decisions.
By adhering to ISO 10360 standards and implementing best practices, companies can achieve traceable, reliable, and compliant measurement results — reducing risk, improving product quality, and enhancing competitiveness.
As digital engineering continues to evolve, accurate 3D modeling will remain a cornerstone of innovation, inspection, and industrial excellence.


