In industries such as cement, lime, ceramics, and metallurgy, kilns are essential equipment for high-temperature processing. At the heart of every kiln is its refractory lining—a protective barrier that shields the kiln shell from extreme heat, chemical attack, and mechanical stress.
A properly selected and installed refractory lining ensures long service life, energy efficiency, and safe operations. Conversely, poor installation can result in premature failures, unplanned shutdowns, and substantial financial losses.
This comprehensive guide walks you through everything you need to know about kiln refractory installation, from preparation and materials selection to installation techniques and best practices.
Understanding Kiln Refractories
Before diving into installation, it’s important to understand what refractories are and why they matter.
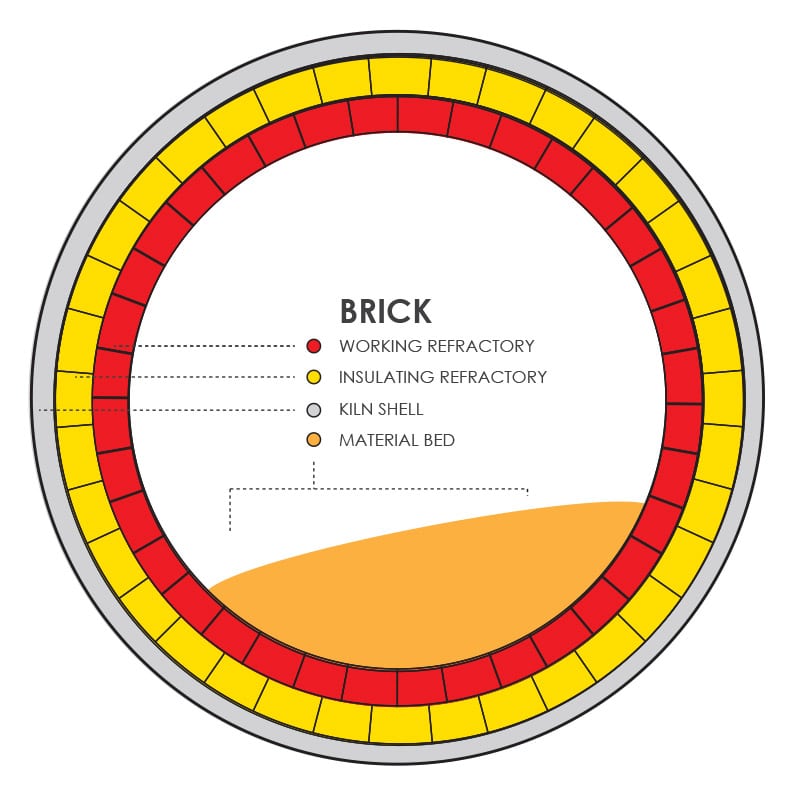
- Definition: Refractories are heat-resistant materials designed to maintain strength and chemical stability at high temperatures.
- Purpose in kilns:
- Protect the kiln shell from heat damage.
- Improve thermal efficiency by reducing heat loss.
- Resist chemical corrosion from process gases and raw materials.
- Withstand mechanical wear from rotation, abrasion, and load.
Types of Kiln Refractories
- Fireclay bricks – affordable, suitable for lower-temperature zones.
- High-alumina bricks – widely used for cement rotary kilns due to higher heat resistance.
- Magnesia bricks – excellent for basic slag resistance in lime and cement kilns.
- Silica bricks – common in glass kilns and coke ovens.
- Monolithic refractories (castables, gunning mixes, ramming masses) – used for fast installation, repairs, and irregular shapes.
Pre-Installation Preparation
Successful kiln refractory installation begins long before a single brick is laid. Proper preparation ensures smooth execution and a durable lining.
a) Inspection of Kiln Shell
- Check for shell roundness using templates or laser scanning.
- Identify areas of deformation, bulges, or cracks.
- Ensure all structural repairs are completed before lining installation.
b) Surface Cleaning
- Remove dust, rust, old refractory debris, and moisture.
- Clean using wire brushes, sandblasting, or compressed air.
c) Anchoring and Support Systems
- For monolithic refractories, inspect anchor materials (stainless steel, Inconel, or heat-resistant alloys).
- Ensure proper spacing, welding, and alignment of anchors.
- In brick linings, confirm correct dimensions of retaining rings and expansion gaps.
Installation Techniques
Different kiln refractory types require different installation methods. Below are the most common approaches:
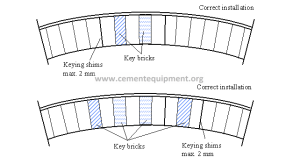
a) Brick Lining Installation
- Laying Procedure:
- Start from the kiln discharge end and move upwards.
- Use key bricks at intervals to lock the lining.
- Maintain tight joints (~1–2 mm) to minimize mortar use.
- Mortar Application:
- Use only high-temperature bonding mortar.
- Apply thin, even layers to avoid weak points.
- Expansion Joints:
- Leave specified gaps (~2–3 mm) at intervals for thermal expansion.
- Fill gaps with ceramic fiber paper or insulating material.
b) Monolithic Refractory Installation
- Castables: Mixed with water, poured, and vibrated into forms.
- Gunning mixes: Applied pneumatically for fast repairs.
- Ramming masses: Installed by tamping in tight spaces.
- Precautions: Ensure correct water content and curing conditions to prevent cracks.
c) Special Installation Areas
- Burning Zone: Use high-strength, abrasion-resistant bricks.
- Transition Zone: Consider thermal shock-resistant materials.
- Cooler Sections: Install insulating refractories to reduce shell heat loss.
Curing and Dry-Out
After installation, refractories must be cured and dried to remove moisture and develop full strength.
Curing
- Castables require 24–48 hours of curing at ambient conditions.
- Cover exposed surfaces with wet burlap or plastic sheets to prevent rapid drying.
Dry-Out (Initial Heating)
- Use a controlled heating schedule to drive out water safely.
- Rapid heating can cause explosive spalling.
- A typical dry-out curve:
- Hold at 100–120°C to remove free water.
- Gradually raise temperature in stages.
- Hold at intermediate steps before reaching operating temperature.
Quality Control and Safety
Quality Checks During Installation
- Measure brick joints regularly.
- Inspect anchor spacing and welding quality.
- Verify mortar mixing ratios.
- Ensure uniform thickness of lining.
Safety Guidelines
- Provide proper ventilation when using gunning machines or mixing castables.
- Workers must wear PPE (helmets, gloves, respirators, eye protection).
- Follow lock-out/tag-out (LOTO) procedures during kiln shutdown.
Common Installation Mistakes to Avoid
- Improper shell cleaning: Leads to poor adhesion of lining.
- Incorrect anchor spacing: Causes spalling of castables.
- Excess mortar thickness: Creates weak joints and cracks.
- Skipping expansion gaps: Results in brick buckling and failure.
- Rapid dry-out: Causes explosive spalling in monolithics.
Maintenance and Repair Considerations
Even with perfect installation, refractories degrade over time. A proactive maintenance strategy extends kiln life.
- Regular Inspections: Infrared thermography to detect hot spots.
- Coating Management: Maintain protective coating on bricks in burning zones.
- Spot Repairs: Use gunning or patching mixes for localized wear.
- Scheduled Relining: Plan major shutdowns to replace worn sections before catastrophic failure.
Best Practices for Long Service Life
- Select materials based on operating zone requirements.
- Follow manufacturer guidelines for mixing and application.
- Train workers on proper refractory handling.
- Maintain accurate installation records for future reference.
- Collaborate with refractory suppliers for tailored solutions.
Conclusion
A kiln’s performance and longevity largely depend on its refractory lining. Proper installation is as important as material selection—the best refractory will fail if installed incorrectly. By following best practices in preparation, installation, curing, and quality control, industries can ensure safer, more efficient, and more durable kiln operations.
With careful planning and attention to detail, your refractory lining will deliver maximum performance, reduce downtime, and minimize costs.